Disable Multiple Chrome Processes
Google Chrome has been designed to create an individual process for every browser tab, plugin and extension used on the computer. This design is based on the concept of preventing complete browser failure, if something goes wrong with the browser. For example, if you open your favorite website on Chrome and then open other websites, your favorite website will remain active and accessible in its own browser tab, even if other browser tabs crash. However, this feature can sometimes lead to Excessive RAM usage and slow down both the browser and other Apps running on the computer.
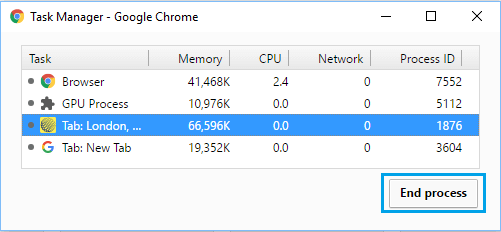
1. Terminate Chrome Processes Using Chrome Task Manager
Google Chrome has its own built-in Task Manager that allows you to view all the Chrome Processes running on your computer and close or terminate any running process.
Open Chrome browser > click on 3-dots Icon > hoover your mouse over More Tools and click on Task Manager in the side menu.
On Chrome Task Manager screen, select the Chrome Process that you want to close and click on the End Process button.
This will terminate the selected Chrome Process, preventing it from using resources on your computer.
2. Stop Background Running Chrome Processes
Even if you close down Chrome browser, it can continue to run processes in the background. This happens when you install Chrome Plugins and Extensions that have a default tendency to run in the background.
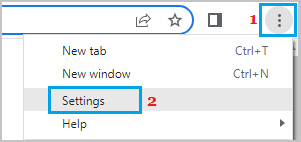
- Open Chrome browser > click on 3-dots Icon and select Settings in the drop-down menu.
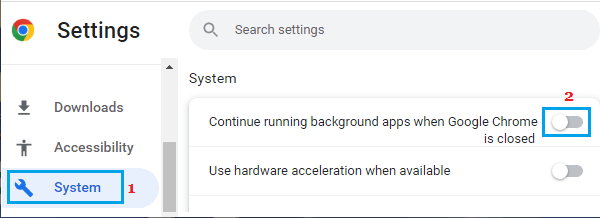
2. On the Settings screen, select System in the left-pane. In the right-pane, disable Continue running background apps when Google Chrome is closed option.
This will prevent the browser from running Chrome processes in background on your computer.
3. Set Chrome Browser to Open Single Process For Multiple Tabs
It is also possible to setup the Chrome browser on your computer to create only a single Process, even if you open Multiple tabs on the computer.
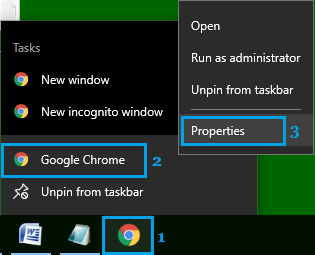
Right-click on the Chrome Icon (in Taskbar, Desktop or Start Menu) and click on Properties in the right-click menu.
On Chrome Properties screen, go to end of the line in Target box and Insert the phrase –process-per-site after the end of the text which is currently in the Target box.
Note: There needs to be a single space before –process-per-site 3. Click on Apply and OK to close Chrome properties screen. In case you notice any issues after making this change, simply remove the parameter (–process-per-site) from the shortcut and everything will be back to normal. This method of making Chrome Browser to open a single Process for multiple tabs works best for those users who have the habit of opening a large number of tabs from the same website.
Use Less Tabs & Extensions
Another way of preventing Google Chrome Browser from running multiple processes on your Computer is to simply use fewer Tabs, Extensions and Plugins. Also, delete all unnecessary Plugins and Extensions and avoid opening multiple tabs. Instead of opening multiple tabs, you can get used to bookmarking web pages on your computer.
How to Reset Chrome Browser to Default Settings How to Clear Your Browsing History in Google Chrome